Most hosts will only make backups on a weekly basis, and most of the time these backups will only be used in the event of a hard disk crash. Therefore, if you have a problem with your site and need to restore a backup of your site, you'll need to use your own backup. cPanel makes this quite easy.
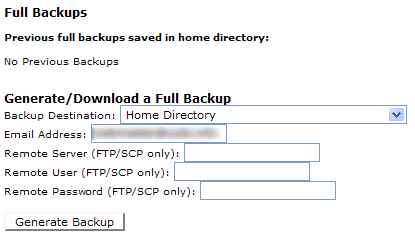
In cPanel, click the "Backup" link. You will be presented with a page similar to this one:

The backup generated from this page will include everything which can be downloaded from your account: databases, your site's files, emails, etc... Depending on what you want, cPanel can generate the backup and put it in your /username/home/ directory on the server, or transfer it via FTP to another server/account.
If you wish to have cPanel save the backup on the server, select the "Home Directory" option under "Backup Destination". The email address entered below this selection box under "Email Address" will be emailed when the backup has been generated and saved in your home directory on the server. When you are ready to have the backup generated, click "Generate Backup". Once you get the confirmation email from cPanel, your backup is ready. You can leave this backup on the server and/or download a copy via FTP (you will find it in the root directory when you connect, alongside the directories "www", "mail", "etc"...).
If you wish to have cPanel transfer the backup via FTP to another server, or to another account on the same server, select the "Remote FTP Server" option under "Backup Destination" (unless you know that the FTP server requires passive mode transfers, in which case you should select the last option). The email address entered below this selection box under "Email Address" will be emailed when the backup has been generated and saved in your home directory on the server. In the "Remote Server" box, enter the address which you connect to via FTP: this is often "yourdomain.com" or "ftp.yourdomain.com". In the "Remote User" box, enter the username which you use to connect to this account via FTP. Finally, in the "Remote Password" box, enter the password which you use to connect via FTP. When you are ready to have the backup generated and transferred, click "Generate Backup". Once you get the confirmation email from cPanel, your backup is ready.
Restoring a backup is quite simple, but can require a lot of time. In cPanel, click the "Backup" icon. On the page you are presented with, find the "Restore a Home Backup" area:
![]()
Click the "Browse" button, find the backup file on your computer, and click the "Upload" button. Depending on the size of your backup, this process can take a long time. It is probably best for you to leave the computer while this is happening so as not to get frustrated at the time it takes!
Sub-domains are domain names with the form "something.yourdomain.com". They can be use to separate a part of your site, or to make your site look bigger than it is! Subdomains are often used for forums, for example.
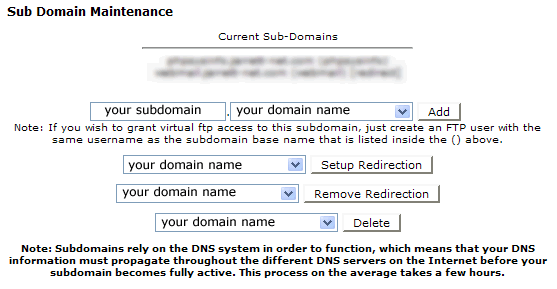
In cPanel, click the "Subdomains" icon. You will be presented with a page similar to this one:

To add a subdomain, enter it's name in the box marked "your subdomain" on this screenshot. Then select the domain name to which you wish to add a subdomain. Then click the "Add" button.
cPanel has now created a subdomain, and a directory with the same name in your site's files. You can either put the subdomain's files in this directory, or you can create a redirection for this subdomain, which will redirect visitors to your subdomain to the address you supply. To do so, select your subdomain and click "Setup Redirection". In the box below "subdomain.domain.com is currently being redirected to", enter the address to which you wish to redirect visitors to your subdomain. Now click "Save".
An autoresponder is an email account which replies to all incoming messages with a standard reply. This can be a message reassuring the sender that their message has been received and will be read as soon as possible, or it can be further information on a company's products & services.
In cPanel, click the "Mail Manager" icon. Then click "Autoresponders". You will be presented with a page similar to this one:

To add an autresponder, click the "Add Autoresponder" link. You will now see this form:

In the "Email" field, enter the name of the address to which you wish to add an autoresponder, for example "sales". Then select the domain to which you wish to add this autoresponder.
In the "From" field, enter the address from which you wish the autoresponder's emails to come from.
In the "Subject" field, enter the subject of your autoresponder's emails.
Leave the "Character Set" selection box alone, unless you have particular needs (for people writing in Asian languages, for example).
If you are creating an HTML autoresponder, click the "HTML Message" box. If you tick this box, you must write your message as an HTML message - if necessary create your message in an email client and then copy the HTML code.
In the "Body" field, enter your autoresponder's message, in plain text unless you ticked the "HTML Message" box.
Now click the "Create" button. You can test your autoresponder by sending an email to the address you chose at the top of this form. However, your autoresponder may not respond any more after several consecutive messages, so as not to flood people's inboxes when they send you several messages in a row.
In cPanel, email accounts which forward to another address are known as forwarders. To create a forwarder, click the "Mail Manager" icon. Then click "Forwarders". Finally, click the "Add Forwarder" link. You will be presented with a page similar to this one:

In the "name" field, enter the address which you wish to forward. For example, enter "sales" to forward emails sent to "sales@yourdomain.com". You can enter names for which a POP account already exists: in this case, emails sent to this address will be stored in the POP account and forwarded to the address of your choice. You can also forward emails to multiple addresses: simply repeat the process of creating a forwarder, using the same name every time, but a different forwarding address. In the "your domain name" field, select the domain name to wish you wish to add this forwarder: for "sales@yourdomain.com", select "yourdomain.com".
In the "forwarding address" field, enter the address to which you wish to forward emails. This address can be an account on the same server (for example sales@yourdomain.com forwards to support@yourdomain.com), or it can be on a different server (for example sales@domain-one.com forwards to staff@domain-two.com).
Finally, click the "Add Forwarder" button. Your forwarding account has been created.
© 4WebHelp and Daniel
Page URL: http://www.4webhelp.net/tutorials/misc/cpanel3.php
Back to the "pretty" page!
© 2025, 4WebHelp Team.
http://www.cpsitesaver.com
Hope this helps.
Add a new comment